


How Darts Work
Pneu-Dart disposable darts are ready to use except for the medication that needs to be loaded into them. Each dart will have the proper amount of powder to create the necessary energy to push the plunger to the end of the dart emptying the contents into the animal. A one cc dart will have much less powder than a ten cc dart. When the powder charge is detonated using the medium – rapid injection darts, the contents of the dart are emptied into the animal rapidly.

All darts, no matter who manufactures them, work in the same manner. The needle, or cannula, introduces the drug into the tissue. A medicine chamber holds the required amount of drug. There is a plunger at the back of the medicine chamber to push the drug out of the dart. Behind the plunger there is a self-contained charge to generate the energy to push the plunger to the tip of the dart, which empties the medicine chamber. Behind the charge; there is a cap used to detonate the charge which is struck by a firing pin. There is a light spring in front of the firing pin to prevent accidental detonation. When the dart comes to a positive stop after flying through the air, the energy stored in this spring is overcome by the inertia of the firing pin. You could liken it to having a brick in the back of your pickup by the tailgate. When you slam on the brakes and come to an abrupt stop, the brick slides forward.
On the back of the dart is the tailpiece which captures the pressure of the projector so the dart is thrust out of the barrel. Its second function is to stabilize the dart’s flight as well as to contain the pressure generated inside the dart so the medication will be delivered out the cannula. The higher end projectors will have rifling in the barrel to put a spin on the dart. This stabilizes the flight of the dart as it travels toward the target and provides the accuracy required for longer distances. There are currently two types of tailpieces manufactured. When placing an order for darts, you will need to specify which “type” you will need according to the projector you have. Type “P” tails are for pneumatic projectors. They have a smaller diameter tail. The firing pin safety spring is not as strong as the type “C” tailpieces. The type C darts have a larger diameter tail to engage the rifling of cartridge fired projectors, along with a slightly heavier safety spring. Again, as the dart hits the animal and comes to a positive stop, the inertia of the firing pin detonates the charge, which empties the contents of the medicine chamber.
Going back to the needle end, there is a retention device to hold the dart in the animal as the dart detonates. The fluid contained in the dart is trying to come out of the cannula all at once. All the hydraulic pressure from this wants to propel the dart back out of the animal and spray your medication into the air. The retention device on disposable Pneu-Darts is a gelatin cone that is molded onto the cannula. (There is no need to order one half or one cc darts with gelatin collars. The injection of these small volumes is complete before the dart exits the animal.) Again, injections are made rapidly. After the injection is made, the animal’s body temperature dissolves this gelatin collar and the dart simply falls out of the animal. The time it takes for the dart to fall out can vary due to conditions; the location of the injection site and the animal’s movement to name a few. It might take five minutes, or it might take thirty minutes. I am usually ten miles down the road at another pasture when the dart falls out. If I see one lying on the ground upon revisiting a pasture, I’ll pick it up; otherwise, I don’t worry about it. It’s not to say that by some freak incident you could get a flat tire on your ATV or a calf could step on it and it could become lodged between the toes of the hoof. Out of hundreds that have laid out in my pastures and in my lots over the years, I have never had such an incident. Some spent darts I pick up will have stayed outdoors in the elements a long time. They will be crumpled up and flattened out from the cattle walking on them and also show corrosion of the aluminum, along with a faded color of the tailpiece.
The exception for hunting the darts in the field is when sedating or tranquilizing drugs are being used. I want these darts disposed of in a proper manner, such as a bio-hazard waste bin at the local hospital. If I think there is a chance the dart might fall from an animal in a situation where it could take a great deal of time to recover it, I’ll use a dart with a wire barbed needle. When you find the animal, you’ll find the dart and surgically remove it. Of course you won’t want to administer antibiotics with a barbed needle, for the spent dart will never fall out!
If you find a dart that has struck an animal and you want to make certain the medicine chamber has emptied, there is no need to break the dart or saw it in half. Simply take your 19 gauge fill needle and insert it into the dart’s cannula just like you did when you loaded the dart with medicine. You should find that you will not be able to go into the dart’s medicine chamber as your fill needle contacts the plunger slightly past the length of the dart’s cannula.
NOTES
- Drugs with a heavy viscosity are difficult to draw from the “nurse” bottle with the 19 gauge dart fill needle attached to your hand syringe. You would save a lot of time and make life easier on yourself if you would draw the required amount of drug into your fill syringe by using a three-quarters of an inch by 14 gauge needle. Once you have accomplished this, you can change out the 14 gauge to the 19 gauge and then proceed to fill your dart by inserting the hypodermic needle into the medicine chamber of the dart through the dart cannula. You will want to be holding the dart with the nose up and the tail down while filling
- When you are transferring drugs from the loading syringe into the dart, refrain from pushing the plunger on your fill syringe too fast. The air in the medicine chamber must have time to escape around the hypodermic needle as the air in the chamber is being displaced by the drug.
- If you have inserted a loaded dart into your projector, and find yourself for some reason not shooting the dart, you can retrieve your drugs from it.
- Carefully push the dart out of the barrel with a cleaning rod. Hold the dart with the tail up and cannula down. Insert your fill needle into the dart cannula just to where the tip of the fill needle is at the bottom of the medicine chamber and slowly pull the plunger back on the hand syringe. You should recover ninety to one hundred percent of the drug which could be put back into a vial for later use.
- If for some reason you miss an animal and the dart slides along the ground through the grass and does not come to a positive stop, chances are the dart didn’t detonate. If you can find this dart, you can retrieve your drugs by the manner mentioned above.
- I have heard that once you have emptied a dart by hand, that some people flush the inside of the medicine chamber with water so they can reuse the undetonated dart. I throw the dart away. A small amount of drug left in the dart over time could dry, leaving a residue within the drug chamber and thereby hindering the ability for the plunger to be displaced with the same effectiveness. This, in turn, leaves you with a defect dart. I want to make sure that when I shoot a dart into an animal it deploys the drug.
- Pneu-Dart is currently manufacturing the ½, 1, and 1 ½ cc darts that have a transparent polymer body. These are nice! The plungers are a bright color. You can see the plunger at the rear of the medicine chamber as you fill the dart. With a pair of field glasses you can see the plunger at the nose of the dart post detonation while it’s still in the animal. The polymer bodies are tougher than the aluminum-bodied dart. I have been told that eventually all the dart capacities will be manufactured in this manner, but it will be some time before they hit the market. It will be an arduous undertaking and I am sure the company will perform extensive testing prior to releasing this new development. These new design darts should shoot very similar to the aluminum-bodied darts that you are accustomed too.
Pneu-Dart, Inc. does not condone nor promote the extra-label use of veterinary pharmaceuticals unless on order and under supervision of a licensed veterinarian.
Think
It states right on the label of some prescribed drugs that it is not to be used in powered syringes. Well, that is exactly what a dart is; a power syringe that flies. This makes for a very dangerous situation, as not only could you inject yourself easily, but an innocent bystander forty yards away could be in trouble.
As with any firearm, safety rules and caution needs to be at the forefront of your thoughts. While driving west on a highway before entering Stillwater, Oklahoma to purchase some needed supplies, I noticed a barn covering a set of steel corrals and a working chute. I was impressed with all the thought that must have gone into its construction. It was laid out in a manner to handle cattle in a very efficient manner.
Just away from the cover of the barn was a loading chute that had a rather large sign by it with just one word: THINK. I believe the owner placed it there for the benefit of his hired hands. It’s easy to get injured or injure the livestock if your head is in a location where the sun doesn’t shine. This one word piece of advice certainly applies to handling drugs and guns, especially at the same time!
Aside from the normal precautions and safety rules regarding guns and their handling, you should also keep alert to the characteristics of the drugs you will be using. I am unaware of any antibiotics currently manufactured that would pose a significant risk to human life or health if just skin exposure occurred. Now that doesn’t mean there are not some others out there that I am unaware of. Read the precautionary labels on your medications and if you are unsure or don’t know, ask someone that does – specifically your Vet! If you really want to stay on the safer side of things YOU SHOULD ALWAYS WEAR SAFETY GLASSES AND GLOVES WHEN HANDLING ANY DRUG.
I am aware of some drugs used in sedation and tranquilizations that are very dangerous to humans should accidental exposure occur. Should you get a droplet of one of these drugs on your skin, you could be in trouble. If you accidentally get sprayed or the drugs come in contact with your mucous membrane, such as your nose, eyes or mouth, you are in trouble. There is a synthetic morphine manufactured that is 10,000 times more potent than actual morphine. (Now you know how elephants are knocked out.)
Anyone dealing with such drugs should have the antagonist, or reversal dosage pre-loaded for injection should any person be accidentally exposed to these drugs. This should be a first step before handling such drugs. Some of these potent drugs have no antagonist that exists. A face shield, latex gloves and arm covers should be employed whenever mixing such drugs and loading them into a dart.
I learned a great deal on the subject of “The Chemical Immobilization of All Species of Wildlife” while attending a class by Dr. Keith Amass of Safe Capture International. One of his points I can share with you is that you should always advise your physician and local hospital of potentially dangerous drugs you are handling before you handle them. This way, if an accident were to occur, they know immediately what you were exposed to and procedures required that can be taken to save you or a coworker’s life.
I would suggest that any reader of this publication that has an interest in “tranquilizing” take the course put on by Safe Capture International. They have a web site, www.safecapture.com, and you will find they put on scheduled classes around the United States. Not only will you be taught how to keep yourself safe, but also the animal under your care and control. Unless the curriculum has changed, after completing a sixteen hour course and passing a final exam, you will be certified in the chemical immobilization of animals. I intend on “refreshing” myself again with this class when given the opportunity.
If you look on the label of any prescription drug bottle you will note a box labeled “Note to the Physician.” It would be a good idea that ole doc knows what to do immediately for you without having to take the time to read the drug bottle while you’re lying on the stretcher.
Be and stay educated and informed on what you are doing and the potential consequences of your actions.
Consider yourself to be weaned and on your own. If you screw up it’s not the drug manufacturer’s fault. It’s not a dart company’s fault. It’s not someone that’s distracting you that is at fault. It’s your fault.
Think.
Don’t let yourself become complacent with firearm safety either. Complacency is just a form of not thinking and I am guilty of this once in a while. I am going to make an excuse while there is no excuse. Here it is.
My cousin had been unexpectedly admitted to the hospital after recently purchasing some stocker cattle. I told him I would go check his cattle and dart any that looked bad. I asked him which of the steers had received darts and what medications were used. He couldn’t tell me much, as he had not kept medical records on them. (I’ll get to the importance of keeping cattle medical records later in the book.)
Well, back to the story. There were three heads that were in pretty bad shape. The first one I ran across had evidently never received a shot before. With the steer being one of the smaller ones weighing around 450 pounds, I shot him with a 5cc dart containing the prescribed drug at a 10 yard distance. I got him.
The second one I found was lying down by himself and had been darted more than two times judging from his behavior. I shot it with a 6cc dart from the pickup window as he was in a fast walk 25 yards away trying to put some additional distance between us. I got him.
I found the third steer hiding in a patch of weeds on the other end of the pasture. It’s hard to tell how many times he had shot this calf! After several attempts to get a good broadside standing still shot, it became evident that I was going to have zero cooperation on his part. I was using an X-Caliber projector. I had it loaded with a dart and charged the projector with CO2. The barrel was sticking out the window of the truck. I took the safety off, and just as I was getting ready to fly the dart towards him, he turned 180 degrees and was shortly on the opposite side of the truck. At this point, I was feeling very sick with a “stomach virus,” and I really wanted to get myself back to my house. I slung my door open to exit the truck so I could get a shot from across the hood. I neglected to put the X-Cal back onto safety. I must have touched the trigger while getting out, and injected my door panel! (see photograph)
After loading another 6cc dart with the prescribed drug I finally shot the steer in the neck forty-five yards away as he was in a fast trot. I finally got him!
The outcome to all this turned out OK, but I was fortunate. It had the potential to be a very bad deal just because I was thinking of getting the hurried shot off instead of what was really important. Don’t become complacent Mark! A few days later I placed a duct tape Band-Aid on the door panel. It should serve as a good visual reminder for me to THINK.
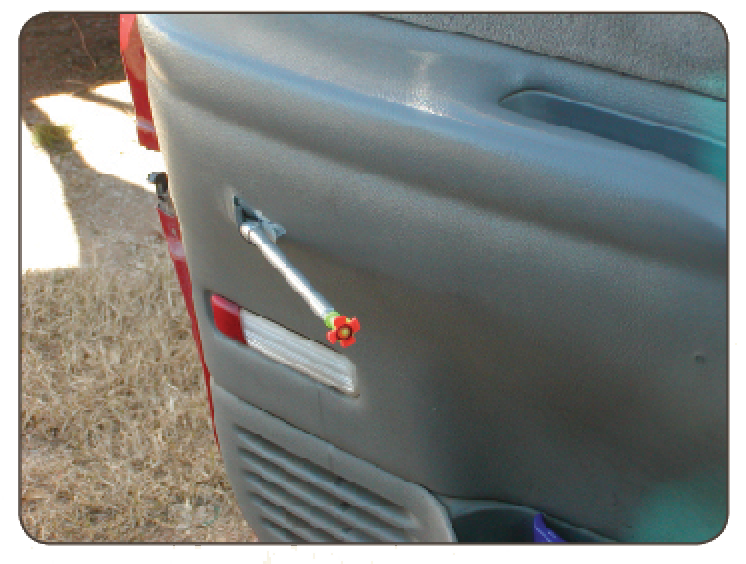 The photo should also give you an idea of what extreme excessive impact trauma is. I know a fellow who was doctoring his 300 pound cattle with 3cc darts and ended up with a problem. He was injecting the cattle at close range and was unattentive when he chambered a yellow load instead of a green load. He buried a 3cc dart up to the tailpiece in the neck of a calf. At least he didn’t hit anything vital; but he did have to catch the calf to remove the dart and treat the wound.
Common Sense
The whole secret to keeping your livestock healthy and your production cost down is to doctor the animal at the first sign of sickness. I would prefer doctoring two head that might have gotten better on their own as to miss one that really needed it. When they’re dead, that pink slip can really impact your bottom line. If I see a calf that is lying down while the rest of the herd is up grazing, I make it stand up. If that animal doesn’t stretch after getting to its hooves, it might get a shot. If I don’t like the posture of a calf that is standing with its head out and down, it gets a shot. If one comes up slow and its ear or ears are down a little bit, it gets a shot. If one is breathing hard and has a little foam at the mouth, it definitely gets a shot. If one doesn’t look bright eyed, and has that “I don’t care” look, it gets a shot. If you have any doubt get the gun out. Some of cattlemen’s worst case scenarios are chronics; those cattle that won’t live but they won’t die. You know what I’m talking about; cattle that you medicate and save, but six months later still looks like it did the day you purchased it, or worse! Chronics can be greatly reduced or eliminated by treating them as soon as possible in a pasture setting without them undergoing the stress of being chased and run through the squeeze chute.
Before I started using a reliable remote injection method, I would be out on the horse and know an animal needed a shot. By the time I sorted him off the herd, ran him to the pens and then through the chute, he damn sure needed a shot! The same holds true for roping and using a hand syringe out of the saddle bag. It’s all about stress on the animal. One shot with a Pneu-Dart out in the pasture with the proper drug in a timely fashion can save doctoring him every day for a week.
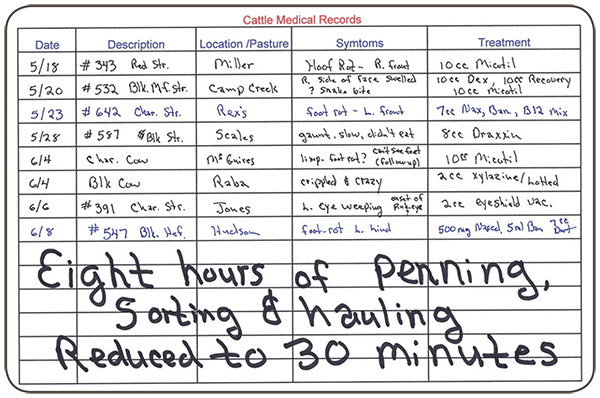
One problem I encountered years ago was animal identification. I might have 80 head of black cattle looking like peas in a pod. Determining which animal had received an injection the day or days prior would be extremely difficult if not impossible even by the same day-to-day caretaker. This problem was solved by attaching numbered ear tags as the cattle are initially processed. Accurate medical records can be kept containing information as to which animal got what drug and when. This way, if I am away for a few days, the rest of the crew or whoever was looking after the cattle will know what is going on and I will know the changes upon return. This eliminates medicating an animal with a “follow up” shot that turns out to be the wrong animal. The records will also let you know if an animal is suffering a relapse a week after you initially treated it. Should you have to eventually pen the animal and have the vet treat it, you can show him exactly what drugs have been used and the date they were administered. Keeping records is not that hard, and can be an invaluable tool. At the end of this chapter will be a picture of a chart I made and used.
I had a neighbor years ago that had expressed an interest in purchasing Pneu-Dart equipment, but thought it too expensive. He had a herd turned out on a wheat pasture and encountered an outbreak of foot rot, which is easily cured with a prescribed drug. While he was purchasing drugs at the vet clinic, he was griping about the cowboys running 25 pounds of weight off each calf in an attempt to isolate the infected cattle for treatment. The vet’s assistant told him, “Well, 125 head @ 25 pounds per head equals 3,125 pounds. At $95.00 CWT that’s only $2,968.75!” He then asked the client why he had not bought a dart gun from Mark. The neighbor did call me later the same day, as it didn’t take long for those figures to sink in.
Of course the above figures change with the markets, but regardless of whether the cattle are worth $25.00 per CWT or $125.00 per CWT, remote injection makes sense and is cost effective.
Folks, I like to cowboy as much as the next guy or gal. I know its fun, but there’s the cowboy way and then there is the cattleman’s way. Depending on the market, if one or two head are prevented from death or from becoming chronics, the equipment will have paid for itself. Then you can take a look at the convenience and time saved. If you have to doctor a critter far from facilities, by the time you lot it and spook the rest of the herd up, get a trailer, load it and drive to facilities, doctor on it and then haul it back to the pasture someday when it’s well, the cost of the dart looks pretty cheap to me. To boot, you are not stressing the animal excessively. I tend to stress out myself upon occasion; especially when a five minute job which could be accomplished with a dart gun turns into a half a days work by conventional methods.
You received a load of 125 head of stocker cattle the night before at 2 a.m. in the morning that had just undergone a twenty hour haul. It is 1 p.m. the next day and the temperature is 102 degrees. The cattle have eaten some hay and feed you put out before they arrived and they have all had a drink of water. The cattle are resting beneath the shade trees in your lot. You see three head that sure need a shot. Common sense should tell you to dart the three head right where they are and leave the rest of the cattle alone. By penning half the cattle into the sorting pens and running them around in the heat to isolate the three head, you will push who knows how many head to sickness by the stress you would invoke on them in the heat of the day.
As stated earlier in this writing, I’m still learning myself. Much of the contents herein have been learned the hard way. I hope this writing will help some people avoid mistakes I’ve encountered. When you purchase your darting equipment, spend as much as you can afford towards the projector. This is a one time investment, especially on the higher end models. I see people attempting to use their old projectors designed to shoot the reusable type of darts to project disposable darts. What they run into is there is limited power control on these projectors. Pneu-Dart darts weigh much less than the reusable kind and fly much faster. This makes giving a proper injection difficult with an antiquated projector. Over time, they figure out they would have been ahead to have just obtained the best equipment in the first place. Usually in this type of scenario they eventually end up buying a projector designed for the disposable darts and keep the old projector for an emergency back up just in case the Pneu-Dart projector gets stolen or run over by a truck.
People will steal your dart gun. In more than one such case I could not get the victims of such thefts new replacement rifles fast enough! I guess it’s kind of like leaving your house without your cell phone in this day and age. You feel somewhat lost without it.
Every once in a great while I’ll have someone ask me about a crossbow projector that is capable of twenty or thirty cc injections. All I can tell them is that there are very few drugs out there that I know of that are labeled for more than 10cc per injection site; then I remind them what century we are in. Putting all that aside, think of the impact trauma generated to the animal’s tissue that occurs if it is close enough to be hit by one of those things! Common sense would dictate that it would not be a good idea to use a framing hammer to complete the finish work in your house.
Choosing Your Equipment
Should you be a “new” user of remote injection you might be overwhelmed from the choices available to you and have concerns of where to begin. This is my advice to you and how I go about getting people what they need for their particular operation.
Start out by determining the weight of the animals you plan on medicating. Of course, this will vary according to your operation. The cow/calf people will need an array of dart capacities, as they could be medicating everything from a baby calf to a bull weighing a ton. The stocker/feeder needs will be most likely generated from handling cattle in a weight range from 400–900 pounds. If you are a feedlot operator, chances are the cattle will be weighing from 700–1300 pounds. So, the first step is to determine the weight class of your cattle. Make a list of these weights in a column on a piece of paper.The next step is to anticipate the drugs you will be using, the volume of drug required for the size on your animals and for what purposes. Write down afflictions you could be treating. Choose drugs your veterinarian has suggested. Having been in the cattle industry awhile, you should already have an idea of what drugs work for afflictions your cattle have had in the past. Write these drugs down on the same piece of paper, along with the appropriate dosage in milliliters per hundred weight or milligrams per pound; whatever the label or your vet tells you. Take the weight of the cattle multiplied by the dosage required, and you will know the total volume of drug you will need. This can vary from a 2cc dart to administer a vaccination, to a combination of dart capacities required to obtain a sufficient dosage.
The cow weighed around 1200 pounds. My vet suggested I administer ten milligrams per pound of body weight. The math is easily figured as 12,000 milligrams for a total volume of drug for this cow.
With antaplasmosis, stress can certainly kill the animal. Had I roped her and pulled her out of the water in order to treat her, I most likely would have killed her according to my veterinarian. Had I waded out into the water and attempted to give her the medication via hand syringe, she would have most likely killed me! As it turned out, we all survived and she raised her calf.
Next, after determining the capacity of the dart or darts will be to determine the length of the cannula, or needle you will need to meet the requirements of the drugs you will be using. Many of the modern drugs require a one-half inch needle for Sub-Q injections when utilizing darts. Some drugs are best administered with an I.M. (intramuscular injection) which will call for a three-quarter inch or longer needle. Some drugs can be injected in either manner. The drug’s label and your veterinarian will be the best source of information.
The cannula length of your dart can also be dependent upon the size of the animal you are medicating when making an intramuscular injection. If you are using a one inch needle to make an I.M. injection on a baby calf, and a neck shot is your goal, you could possibly hit the jugular vein. As stated more than once elsewhere, the volume content of a dart is injected in a split second, so you run the risk of immediate death to the calf if you make a poor shot and hit the jugular vein. Just a small volume of drug would blow the vein apart upon dart detonation, resulting in immediate death to the animal. A better choice would be to use a three-quarter inch needle. Order darts with needle lengths appropriate for your specific application.
There are two other dart cannula options available on three-quarter inch and longer to take into consideration when placing your order. Both of these options are utilized to spread medications to more tissue than conventional cannulas. A “side-port” needle has one hole drilled in the side that is behind the sharpened opening, allowing drug dispersal to dispense out the end as well as the side. The “tri-port” cannula will have two opposing holes drilled behind the sharpened port. Both of these will spread the drugs to a greater amount of muscle tissue, which allows for faster absorption into the animal’s blood stream.
Remember that when you order your darts to specify type “C” for cartridge fired projectors and type “P” for pneumatic projectors and Type “U” is for any dart 6cc or larger. Note: Type “U” darts automatically include a flight stabilizer. (Reference the “How Darts Work” chapter.)
There is a circumstance when you should use type P darts with flight stabilizers for use in your cartridge fired projector. Flight stabilizers are the rubbery clover leaf shaped fins that are on all darts of a 6cc capacity or larger. This “circumstance” is when you are required to make very close shots with small darts out of your type C cartridge fired projector.
An example of this circumstance would be doctoring a baby calf with a 3cc dart at a distance 20 yards or closer. Here is an explanation of why this circumstance exists: A type C tail piece has a solid plastic tail that engages the rifling of the dart barrel. To overcome the friction generated by putting a “spin” on the dart as it goes down the barrel requires a certain amount of force. This force is adjusted by the power load strength in combination with the power setting on your rifle. When enough “force” is achieve to push the dart out of the barrel with a consistent speed, it is too much force to strike the animal at a close distance without excessive impact trauma. If a brown load with a projector setting 2, (B2), the dart will be sticking out the end of the barrel but has not taken flight. If you turn the power setting up to 3, the dart will strike the target high in elevation and excessively hard at 10 yards.
The solution is to order a few type P darts with flight stabilizers for close work. You must specify this when ordering; otherwise you will end up with normal type P darts. These darts will allow you to utilize brown loads in combination with the 1 and 2 power settings for the closer distances and small capacity darts. The solid tails will still be used on the medium to long range shots as these lightweight darts can be shot further without the stabilizer slowing them from the air drag they generate.
You cannot use a type P dart without a flight stabilizer in a cartridge fired projector. Without flight stabilizers they just flop around in the barrel, and will fall out of the barrel if it is tilted downward. You cannot use type C darts in a pneumatic or CO2 rifle. The tails are too large to go down the barrel. You can use any type P dart in a cartridge fired projector as long as it has the flight stabilizer and you have made a trajectory chart noting the flight of this type.
At this point in time, you have written on paper the size of an animal and the sickness you have experienced with the cattle in the past. You choose the drug to treat anything you anticipate doctoring. You have read the label of your medication chosen and know how many cc or milliliters to give per hundred weight; (or how many milligrams per pound). You should always be advised by your veterinarian. He or she will most likely tell you off the top of their head what drug to use, what dosage to give and how it should be administered. Most of the drugs that work these days are usually by prescription from your veterinarian.
Next, you will have to determine which dart gun to pick, or “projector” being the proper name, to get the “flying syringe” to deliver the drugs.
When purchasing a projector, the old adage “you get what you pay for” certainly holds true. The mid-priced cartridge fired projectors seem to retain their value. Used dart projectors for sale are next to being nonexistent. Having experienced the convenience and cost savings of owning one, people are reluctant to do without one. If the gun is cared for, it’s likely your grandkids could be using it someday. I have seen a couple of model 196’s sell at auction at “farm sales” or estate sales when a rancher is retiring or has deceased. If the projectors are in good condition, they virtually bring the same amount as what a new gun would cost.
Pneu-Dart manufactures four different types of projectors. Those being air activated, ungauged CO2, gauged CO2, and cartridge fired. No federal firearms license (FFL) is required to acquire any of the air or CO2 models. All cartridge type projectors must be obtained through an FFL dealer.
I have shot and used all the models I am about to describe. The following text will be brief descriptions of what I feel are the attributes and shortcomings of each projector.
AIR ACTIVATED AND UNGAUGED CO2 PROJECTORS
The model 179B is a CO2 pistol that utilizes a 12 gram “bottle” of gas similar to those used in BB guns and pellet rifles. This projector is basically for small capacity darts for use at short ranges. It is smooth bored, which puts no spin on the dart as it is fired. A type “P” dart must be used. It is capable of delivering a 3cc dart to a distance of 30 yards. I have shot 5cc darts out of it to 15 yard distances by use of “holdover”. The power control positioned on the rear of the dart bolt is of a crude nature. It consists of a knob that turns a screw which will open or restrict the amount of gas allowed to enter the dart barrel. An accurate count of how many times it has been fired during use is mandatory, for being ungauged, you won’t know when there is an insufficient amount of gas left in the cylinder to shoot the projectile the required distance. Due to the nature of CO2, this projector will shoot harder in the summer when ambient temperatures are warm and softer in cold weather. 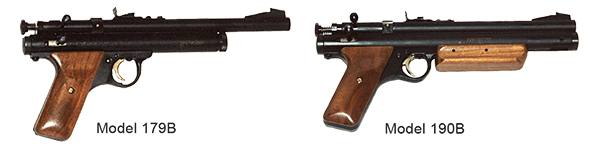
The 190B is an air-activated pistol having the same features as the 179B. The exception being that it is a pump up. I personally prefer this pistol over the CO2 version. You don’t have to depend on having CO2 cylinders with you and you can better control the dart velocities, (distance and impact), by the number of times you pump it. Also, in getting away from the ungauged CO2, it will shoot the same no matter what the ambient temperature is.
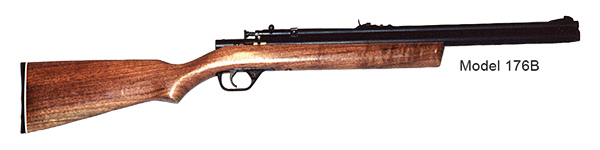
The model 176B is a long gun version of the model 179B pistol. It is smooth bored and uses CO2 cylinders. It was actually in production for three years before the pistol. It can handle the larger capacity darts, although you will still be restricted in usable distances as compared to a cartridge fired model. Temperature issues and a count of the number of times it is fired on a per cylinder basis is still required.
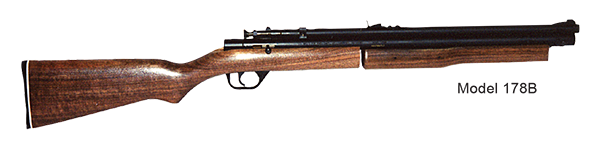
The model 178B is a long gun version of the 190B air activated pistol. It is smooth bored with no rifling. It was in production twelve years before the 190B, and is still one of the company’s best sellers due to the relative cost for an “occasional user”. If you have very many cattle to doctor, it will wear you out pumping it! The more strokes required pumping it, the harder it is to pump. I would not recommend this model for elderly people. If in an ice storm, I would much rather work the bolt on a .22 cartridge model and crack the window of the truck to shoot the calf, than get out in the weather to pump it up. If after pumping the rifle up to maximum and the animal moves closer to you, you will have to know how to restrict the air flow with the crude bolt knob in order to take the shot. I put a Tasco reflex sight on mine obtained from Pneu-Dart, which is a battery powered optical aiming point. This extended the range at which I was able to use the projector. With the gun set up in this manner, I could shoot a 10cc dart to 20 yards with 9 pumps. It’s a nice little projector capable of expelling any capacity of dart for an occasional user on a limited budget.
CARTRIDGE FIRED PROJECTORS
Most farmers and ranchers choose to use cartridge fired projectors. The CCI blanks you order need to correspond to the dart capacities and distances the darts will be used. Generally, brown loads, which have the least amount of powder in them, are for small capacity darts. They can be used on medium to large capacity darts for extremely close shots, say a 6cc dart at 5 or 10 yards. Green loads are “medium”, and contain more gun powder than the brown loads, but not as much powder as the yellow loads. The yellow loads or “blanks” are considered at the high power end. The majority of people use a combination of green and yellow loads to utilize mid to large size darts. Being a cartridge fired projector, type “C” darts are required.

The model 196 is a cartridge fired projector utilizing CCI .22 blanks as a generated source of gas to propel the darts. It has a rifled barrel and is a moderately priced projector. I have used and still do use one of these for 16 years. It’s hard telling how many cattle I’ve doctored and sedated with my 196. This model features five power control settings. The selection of three power loads, (blanks), gives you a wide choice of settings to use virtually any capacity dart. I am comfortable doctoring cattle out to thirty five yards with 10cc darts if that is what is required. My 196 rifle is equipped with a red dot optical sight to give a precise aiming point. The following will most likely not pertain to you as different projectors even of the same model number will not shoot exactly the same. How the rifle is zeroed at a closer range has significant effect from one person’s projector to another person’s; but here is just an example of mine: Using a 10cc dart at 30 yards, I use a yellow load on power setting 4. This shot will require me to “hold” the point of aim 9 inches above the point I want my dart to strike. On a cow at this distance, my red dot will appear three inches above the crown of the animal’s neck, and the dart will implant 6 inches below the top of the neck. With a 5cc dart using the same power load and setting, I can hit the animal at 45 yards using a 7 inch hold over.

The model 389 is a modified 196. This is also a moderately priced projector. In this model, the power control adjustment has been moved to the rear of the rifle. As a result, it allows for a scope that will be mounted on this version when you purchase it. I’ve used one of these off and on for the last 4 years, and it’s a fine shooter. One advantage of having the scope as opposed to the red dot on the 196 is that you don’t have to remember to turn it off when the shooting session is over.
Another cartridge fire projector manufactured by Pneu-Dart is the model 193. This rifle has a “side toggle” system with the power control incorporated into it. You can only load up to a 6cc or smaller dart into the barrel. It’s OK for a “tranquilizing gun,” but has limited uses to doctor cattle.
GAUGED CO2 PROJECTORS
The X-Caliber is a gauged CO2 projector that is, in my opinion, the Cadillac of any projector manufactured by anyone, anywhere, even at higher prices. But still, this rifle bears a pretty hefty price tag. I have used one of these for about 3 years, and naturally it is the best dart gun I have ever had. It has the longest rifled barrel of any projector produced by Pneu-Dart. The butt plate is pulled rearward and turns ninety degrees in order to load your dart. The barrel actually starts at the back of the rifle. This projector is very easy to maintain. It requires no FFL to acquire, even though it looks similar to an assault rifle. You can check it just as baggage on an airline since it is not considered to be a “firearm”.

Here are the attributes of having a gauge: you have infinite adjustment, even more so than the cartridge fired models, but without having to mess with having the proper blank on the proper setting. I can tranquilize a kitty cat a few feet away with a one-half cc dart, then turn around and doctor a ton bull forty yards away with a 10cc dart without having to change anything other than the pressure I’m using. This is accomplished by rotating an “acorn knob” just behind the fore end of the rifle. When this knob is turned counter-clockwise pressure builds up. If you go past the gauge setting required, you simply rotate the knob counter-clockwise to bleed excess gas off. All this can be done while still keeping the animal in the scope. If the animal moves further away from you, you just add pressure. If it starts moving closer, you just lessen the pressure. If you are low on gas you will know it, for the gauge will stop inclining. The projector retains this gas as you remove the empty gas source and install a fresh one. The gun shoots the same winter or summer. You will have the same amount of pressure pushing your dart, and get away from just a simple chamber full of gas that is utilized on non-gauged CO2 projectors.
This projector is low maintenance. By getting away from gun powder, there is no brushing and swabbing of powder solvents anywhere on the projector. What appears to be the muzzle of the barrel is actually a barrel retainer. When this is unscrewed, the actual stainless steel rifled barrel can be easily removed, brushed, cleaned, very lightly oiled and replaced. It just takes a matter of minutes.
This projector is milled from solid blocks of aluminum. It comes with a custom fitted hard case, a 12 gram CO2 adaptor, a 3.5 oz bulk tank which can be refilled, detachable sling loops, a 3X9 mounted scope, and a lifetime warranty.
It’s quite a machine.
Additional items include 3.5 ounce CO2 bulk tanks, CO2 filling stations, a laser sight with or without a flashlight and a sling all can be purchased separately.
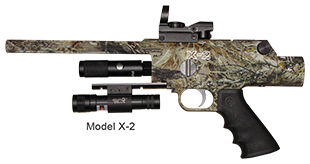
Lastly, there is the X-2. This projector is the pistol version of the X-Caliber, having a pressure gauge as to where CO 2 can be adjusted to specific settings.
I had the opportunity to play with one of these while still in the prototype stage period. I shot this pistol off of sand bags, and ruined many small practice darts by stacking the shots on top of each other in the target. It is a good projector for shooting smaller darts moderate distances, but regrettably, the larger capacity darts could only be fired minimal distances. I have been whining around for the company to invent and manufacture a cattle version of this type pistol that would reliably shoot a 10CC dart at least 20 yards, easily. Given all the stuff I have in my truck cab, having a dart gun I could just lay in the seat beside me would be a plus. I believe my request has been heard, and I expect to see a new model of this type to be available to ranchers in the near future. One that will be capable of shooting a 10CC dart reliably for at least 20 yards.
The X-2 comes in a custom hard case with a holographic sight mounted on the top, and utilizes the 12 gram CO2 type cylinders only. Laser sights are optional.
Equipment Care and Maintenance
None of Pneu-Dart’s projectors are high maintenance. By the same token, none are totally maintenance free. Your dart gun will come with instructions from the company on how to care for your particular projector. I really don’t need to go into depth about this subject, but I will mention a few of the more important things I feel are noteworthy, and possibly not in print you would run across elsewhere.
One of the most important things to take care of on cartridge fired projectors, such as the models 196 and 389, are the power control cups. This very important feature of the rifle allows you to regulate the amount of gas that enters behind the dart. It also allows you to adjust dart velocity, which is directly relative to the range at which you are shooting and the impact trauma your dart will transfer to the animal. I have seen several neglected projectors that have been left on the same setting and shot who knows how many times and were never rotated to different positions. This results in a build up of carbon and gun powder residue generated by the blank loads. The results of this are the power knob and cup cannot be rotated to other settings when needed. I have repaired several of these neglected projectors. Cup removal can be very difficult under these conditions. When the cup is removed and inspected, all the other cup holes of different sizes will usually be completely filled with this residue. This material is so hard that only a drill with the appropriate size bit can remove it. (Most of these neglected guns are purchased by the owner and used by ranch hands that don’t take care of anything.) If nothing else were done other than to place a couple of drops of gun oil once a week where the outside of the cup meets the inside of the housing, while rotating the power control knob, this could be avoided. The power cup is about one-half inch long. The goal is to coat the entire outside perimeter of this cup. The best way to do this is to have the dart barrel opened up to gain access, and hold the stock portion of the gun at a 45 degree angle in an upward position. The oil will disappear between the housing and cup as the cup is rotated, thus, putting a film between the two. The above information generally pertains to the model 196. Unless you are mechanically inclined, you might be well ahead to ship it back to the company for service instead of attempting to remove the cup.
On the model 389, the younger brother of the 196, the power control cup is easily removed for thorough cleaning. The company currently has a video on how to properly clean this model that is available to view on their Web site.
On both the above models, I routinely clean the chambers for the .22 blank loads. You can remove the bolts from these rifles by holding the trigger down with the safety off and pulling the bolt rearward. Once removed, I have a short cleaning rod with a .22 caliber tornado brush. These brushes consist of stainless steel wire loops, and can be worked both in an out. If you use a regular bristle gun cleaning brush, it is very difficult to switch directions and pull the brush rearward. The .22 chamber is not of that diameter all the way through, and has a small hole at the end of the chamber. After brushing, I wet a pipe cleaner on one end with powder solvent. Upon bumping the restrictive hole, the pipe cleaner can be rotated between your thumb and forefinger until it finds this hole, and then is worked through. After that, I remove any excess oil or solvent from the chamber with a Q-tip swab, and then run the dry end of the pipe cleaner back through the small hole to remove any excess solvent that could be present.
If you neglect this chamber cleaning procedure, over time the spent brass blank will adhere to the chamber wall after being fired. When you try to extract it with the rifle bolt, you will find yourself to be looking for a pen knife to extract the spent case from the chamber.
There is a happy medium to how clean you want the barrels of these guns. After you clean the barrel thoroughly and oil everything, store it in a dry location. The worst place to store the dart gun is in a closed gun case that’s meant to transport it. A firearm can severely rust from any moisture present when the case is sealed and there is zero air circulation. When it’s time to use the projector after a good cleaning, it’s a good idea to fire a couple of practice darts through it to blow out any excess oil and to slightly foul the barrel somewhat just prior to using it. A very slick barrel can have an accelerated dart velocity which will cause higher strikes and more impact. A very dirty barrel will shoot erratically and not group your shots well. I will usually clean my barrel after fifteen to twenty shots or once a week, whichever comes first.
Vegetable oil should only be used for lubrication on air or CO2 projectors. Any petroleum type oil will cause disintegration of O-rings and valves. On a side note, this also holds true when it comes to lubricating the plungers on your hand syringes.
Store your packages of darts in a cool, dry location. One of the worst places to leave a package of darts is on the dash of a vehicle with the sun shining through on them. The heat they are undergoing in this type of situation can loosen the gel collar from the needle, or even melt the gelatin completely off the cannula. I had a friend whose hired hands put a whole cardboard box full of darts, over 100 of them, in a small tin well house cover which was exposed to full sunlight. When they went to retrieve this box to use some of the darts the following day, all the gel collars had melted off and there were just green puddles of goo in the packages. The darts were useless without the retention device. If shot into a calf, you would be able to see the drugs simply spray into the atmosphere after striking. It was an expensive mistake.
For transporting the darts in the field, I use dart tubes. These are plastic containers with flip open lids that can carry up to 10 of the large darts per tube. I take several tubes with different capacity dart sizes in them, so I will be prepared for whatever I come across. I mark the tubes by what dart size they contain with a Sharpie permanent marker. I also mix darts of the same capacity even though they will have different needle lengths. With the permanent marker, I mark all the back side of the tails to reference which one I want to pull from the tube for use. An example would be a tube marked “10cc”. I may have both one inch and one-half inch cannula darts in it. I have marked the one-half inch needles on the flight stabilizer. If I want an I.M. injection, I’ll pull out an unmarked dart. This saves emptying the tube to acquire what is required. This is a much easier way to transport your darts. When you open a package of darts, it is similar to opening a can of worms. They can go everywhere. The tubes protect the darts from external forces, and when you go to get one, you won’t have to fumble with the package and fight to get the package to close back up.
For .22 blanks storage I use prescription bottles. It’s not a bad idea to include a small silicone moisture absorbing capsule in this bottle along with the blanks. Your pharmacist will likely give you some of these if you ask him to save them for you. The blanks need to be protected from atmospheric moisture. The blanks shipped from the company are in a Zip-lock bag for a reason. If just the cardboard box containing the blanks is left overnight in humid conditions, the powder in the blanks can draw moisture. This will cause the blanks to perform in a varying manner, and you will lose consistency of the power they generate. I’ll put a label on each bottle containing blanks I take, which will designate if the contents are brown, green, or yellow loads.
If for some reason different power loads become mixed, they can be easily identified by looking at the crimped end. The blanks will have a small amount of coloring on this tip, designating whether they are brown, green, or yellow loads.
Sighting in Projectors
It is imperative to know your equipment and how it will perform before you get into the field and start shooting live darts into live animals. You will save yourself frustration, and money, and perhaps injury to your livestock if you just do your homework. In preparation, you will have your projector and the source of dart propulsion, i.e. a cartridge fired rifle and blanks, or a CO2 projector and the CO2, or perhaps a pump air rifle and you have eaten your bowl of “Wheaties” that morning to have the necessary energy to pump it. You have the practice darts that correspond to the live darts you will be using. You will have pre-measured distances in yards established. You will need a target and a place to shoot from. You will be way ahead to have a steady table and something solid to rest the rifle on while shooting.
When you are sighting in any cartridge fired projector, and shots are being made at thirty second intervals or less, you should employee a “cycling” procedure. Cycling is putting fresh air into the cartridge load chamber of the rifle. When darts are fired in rapid succession the oxygen in the tube in front of the chamber may be depleted. This can result in an incomplete burn of the powder from your succeeding blank, resulting in a slower velocity of the dart to be projected. I have a portable air tank that has a blow valve on the hose. With the bolt of the rifle open I induce fresh air into this chamber with a puff of air. When the air tank is not readily at hand I will simply do this with my breath. If the dart barrel is still closed after a shot has been made and you induce this fresh air, you will note that smoke will exit the muzzle of the barrel as you perform this procedure. Although not necessary, turning the projector’s power setting to 5 will allow an easier flow of this air. It is unnecessary to perform this procedure when you are doctoring your livestock or longer intervals are allowed between shots, as the air will cycle naturally.
My favorite target is to hang a piece of horse stall mat with a canvas Pneu-Dart target stretched and attached to it with three-quarters of an inch drywall screws. This mat will hold the practice darts in place from shot to shot. It’s difficult to tell what you’re doing when the darts strike the target and fall out. For years I used a square bale of hay, and you could get by with such. The problem comes into play by moving it around to the different distances. Many times when using the smaller capacity practice darts, the darts will bury into the bale and be difficult to find and retrieve. I shoot from an outdoor table with sandbags and have the mat on a dolly that can be moved easily to various distances. Keep firearm safety rules in mind and be aware of your surroundings, especially down range. Know where the dart will stop if you have a ricochet or miss the target completely.
Other necessary items to have on hand before you begin will be some cleaning equipment such as a cleaning rod, bore brush, barrel swab or cleaning patches. Powder solvent such Hoppee’s # 9 or Shooter’s Choice should be on hand if you have a cartridge fired projector, along with gun oil, rags, Q-Tips and perhaps some pipe cleaners.
There is a common tie among all dart projectors when it comes to the manner or procedure required to properly sighting one in. The goal is to be able to hit the injection site you have chosen on the animal with the capacity of dart, or milliliter of drug required, at the various distances you would encounter; and to do so with the least amount of force. Just striking the animal slightly more than necessary to implant the cannula into the animal is sufficient to detonate the dart and make the injection. This method will cause the least amount of impact trauma to tissue. Excessive impact trauma results in forming a hemotoma under the animal’s skin. This pool of blood will have to be absorbed over time and can tie up some of your drug, rendering the drugs less effective. In addition, striking the animal too hard can cause your dart to bounce out. If this occurs, not only have you bruised the animal, you have wasted your dart and your drug as it vents into the atmosphere. If your practice dart breaks the fabric of the canvas target you are certainly hitting it excessively hard.
When a dart is flying properly for an injection, the flight pattern will have an arc to it. In other words, when the dart leaves the barrel it will be gaining elevation on its path to the target and begin to descend and lose velocity before striking it. The goal should be to have the dart strike in the last one-third of its flight.
I strongly advise the use of an optical sight on your dart projector. As stated previously in another chapter, this is not for magnification purposes, but a reference point relating to the dart’s flight. Use the practice darts, which already contain a medium closely resembling the weight of a live dart filled with medication. Choose a distance that most of your shots will occur at and choose a dart capacity that will most commonly be used.
With the projector placed on a solid rest, fire the practice darts at that measured distance. There should be reference provided with cartridge and gauged CO2 projectors of suggested power settings for various distances using different size dart capacities. This information is not set in stone. It’s merely a starting point for you. If the dart you shot hits too hard in your opinion, turn the power down. If it hits too soft turn the power up. The power control on the 196 and 389 cartridge fire projectors has the flow, or the power you are using, designated by the numbers on the control knob. When you are viewing this knob as the projector is shouldered, the setting you are using will be the number at the top, or 12 O’clock position of this knob. Be sure than when the knob is rotated to your setting of choice that you feel a positive “click”. This will assure that you are not in between the settings. If the setting is in between when the rifle is fired, there will be very little if any noise generated, and the dart you placed in the barrel will not have moved. Once you are satisfied with the dart’s impact energy, shoot a group of three or four darts. You will find that these darts will make a “group.” Say at your distance, all the shots would strike within a four inch diameter circle, but are hitting eight inches below your point of aim. It is time to adjust your optics. Adjust them as to where the center of your group centers on the point of aim. You have now reached the point where it is time to stop making adjustments. You have the most common size of dart “zeroed” for the most common distance you will be shooting. You will not want to adjust the sight anymore after this point no matter what size dart or power setting you use.

Document your work and make a trajectory chart as you proceed. I always list the dart capacity at the top of an index card, and have a separate card for each size dart. An example of one of my charts is pictured at the end of this chapter. I use five yard increments of distance. Let’s say you used a 7cc dart and now have it zeroed at 20 yards. Again, you have picked this capacity as the one that you will most often use, and the 20 yards is the most common distance that you will be doctoring your cattle at. Move your target to 15 yards, turn the power on the projector down, and shoot another group. If it does not zero out, but is striking plenty hard, measure the group you have and reference where you need to “hold” your aiming point in relationship to where the practice darts are hitting. In other words, if at 15 yards your group is striking four inches lower than where you are aiming, write down under “hold” (+) four”. When you get out in the field and want to make a perfect injection, you will be holding the sight four inches higher than where your dart is going to hit at this distance. The same is applied for negative hold. If groups are hitting above your point of aim, your hold should be that distance held below the injection site. You should reference this in the hold column of the trajectory card as (-4) inches.
Now that you have the 15 and 20 yards completed with the information you can move the target to 10 yards, 5 yard, then out to 25 yards, so on and so forth until your group sizes are no longer practical for your application.
When you are satisfied with your first choice of dart capacity, repeat this procedure with another dart size you may require and make a trajectory card for it. Again, you do not want to make any adjustments on your optics. You will most likely find that at certain distances with certain power settings your projector will zero itself out again. If it does not, it’s no big deal. That’s because you have a reference point of where to aim to hit your target that is established by your “hold” column of information.
On 500 pound or larger cattle, my stopping point is an eight inch group. If all my shots are contained within this perimeter at any range, I feel comfortable in making a suitable injection into the critter’s neck.
As an example, when I’m using a 10cc dart out of my model 389 and have to make a 30 yard shot, I need to hold 10 inches high. My gun is shooting a four inch group at this range. What I do is place my crosshair or red dot about 4 inches above the crown of the steer’s neck and drop the hammer. The dart falls the four inches to the neck and strikes six inches below the top of the neck.
If you are going to be serious about being proficient with your equipment, I would strongly recommend using a rangefinder. Misjudging the distance five yards at the longer distances can mean the difference between a job well done and a complete miss. It doesn’t take many misses when using Draxxin to overcome the cost of a rangefinder.
Should you not be starting out with a rangefinder, that doesn’t necessarily mean you won’t obtain one some day. That is why it is important to use measured distances in yards when you are sighting in the projector. Five of your steps do not mean the distance is five yards. If you encounter distance judging problems and do acquire a rangefinder, the trajectory data you recorded in actual yards for your projector will be right on when you do use a rangefinder.
There is one very important point I have neglected to make. Pick a day to sight your projector when there is absolutely no wind! Proper dart velocities are well below that of an arrow shot out of a bow. Wind can wreak havoc with your information gathering. I will touch on wind and moving targets in the “Making the Shot” chapter of this publication.
After your gun has been sighted in and zeroed under the most ideal weather conditions possible, it doesn’t hurt a thing to use the practice darts to practice in less than ideal conditions that you could possibly encounter out in the pastures. Again, this subject will be touched upon in the above referenced chapter.
On one last note regarding cartridge fire projectors; you should clean the barrel about every twelve or fifteen shots while you are shooting your practice darts. A clean barrel can shoot much differently than a fouled barrel. You don’t want to use a freshly oiled barrel. Your new projector should have dry patches run through the barrel before sighting in to remove oil applied at the company. You should also fire a couple of blanks to blow excess oil out of the chamber and pressure cup of the projector before you start trying to group darts. While sighting in the rifle, I’ll only dry brush and dry patch the barrel in between the twelve to fifteen shots, and only use the powder solvent and oil when I stop for the day. There is a happy medium as to how clean the projector should be for optimum performance. If a slick oily barrel is used, darts have less friction to overcome as they travel down the barrel. If there is too much crud in the barrel, the dart will exit at a slower velocity and your “groups” could be less than desirable. Having said that, you don’t want to store or let the projector sit for long periods of time without oil on everything. When you do store the projector, one of the worst things you can do is to leave it in a closed gun case. Any moisture present will be trapped inside with your gun, and with no air circulation, it will most likely come out with rust all over it when it’s taken out two weeks later.
Making the Shot
Well, you’re out in the pasture and find some cattle that need medication. You have accessed the treatment and determined which drug will work best for you, the capacity required, or dart size, and the length of the cannula required for the drug. You have pulled the required drug and dart from your bag, filled the dart and placed it in the dart barrel of the gun. You might have already predetermined your distance and have the projector charged and on safety. It’s time to get into position for the shot. You could be a little nervous if this is the first time you have actually used your equipment on something alive. Take a deep breath.
Unlike at the range where you prepared for this moment, the target could be moving around on you as well as other animals coming between you and your shot. Have a little patience. If you can get into position from the cab of the truck by driving around a little, great, you’ll have a rest for your arm out the open window. If you must get out and can position yourself on foot without spooking the cattle, that’s great too, you’ll just have to shoot off hand. Hopefully you have practice doing so with the practice darts after the gun was sighted in and zeroed on a steady rest.
The best scenario for you to have is the animal standing still in a broadside position at a ninety degree angle from you. The best injection site for you will be in the neck. There is an ample blood flow and muscle mass to get the medication to work fast when an I.M. injection is sought after, as well as loose hide for a Sub-Q injection. If the wind is blowing, your first choice should be to have the above set up with the wind directly to your back. The next best option is to have it blowing straight into your face.
The only thing left to do now is to judge the distance properly and use the appropriate pressure requirement for your particular projector at that range and pull the trigger. The calf has been medicated without undo stress.
Eventually you will probably run across instances when you need to take some shots in a cross wind situation. The best way to prepare you for such is back at the shooting range. The distances of cross wind deflection are related to the dart capacity you are projecting, the distance to your target and how hard the wind is blowing. The lighter the dart, the more the wind carries it to the downwind side. The longer the distance, which results in a longer flight time, the more the wind will move the dart downwind. Of course the higher the velocity of the wind results in the same old story. So back at the range and using practice darts of the same capacity of live darts you will be using, shoot these darts at different distances in a cross wind situation. Aim directly as you would under windless conditions and take note of how far the dart drifts to the left or right. You might see your darts hitting somewhat lower in elevation also. The cross wind is slowing the projectile’s velocity as the dart is moving to the side. When you find yourself having to make a crosswind shot in the field, you will have an idea of how much distance is required to “hold” into the wind. If the wind is just howling, it probably wouldn’t be a good idea to use a live dart on a live animal with that much crosswind.
Eventually you may find yourself taking a shot at a moving target. This will be more difficult for you to learn, although it is similar to wind conditions. You will not be aiming where the animal is at; you will be aiming where the animal will be by the time the dart arrives. Just like wind, this is dependent upon the dart capacity and velocity, the distance and how fast the animal is moving. If I am shooting a 10cc dart at a cow that is thirty yards away and traveling in a fast trot at a 90 degree angle, I may be pulling the trigger with the point of aim that is a yard in front of the cow’s head in order to make an injection in the neck in front of the shoulder. If the cow is moving directly away from me, I’ll be holding high. By the time the dart arrives, she will not be the 25 yards away when I pull the trigger, but perhaps 30 yards by the time the dart catches up to her.
You may have some better ideas on how to practice for a moving cross shot, but one way I suggest is to glue a piece of cardboard inside an old tire and have a buddy roll the tire in front of you at different speeds at different distances, using practice darts to find out how much “lead” is required. (Make sure your buddy stays under cover when you are shooting!).
The best advice I can give to you is to wait for a standing still broadside shot, and hopefully there will be very little wind present if your dart has a long flight to overcome before it reaches the animal.
Consider the needle length on the dart you are using. It is very important to have close to a 90 degree angle shot when using a one-half inch cannula. The portion of the dart that attaches the dart body to the cannula is called a ferrule. If you shoot an animal at an angle, and this ferrule strikes the critter before the point of this needle, your dart will glance off.
Cattle are dumb animals, but that’s not to say they are stupid. If they are looking right at you as you put the dart into them, they might wonder what happened the first time. If you have to repeat an injection the next day, there will be an association made by it. A few days may lapse and perhaps you want to give a booster shot to keep the blood level of the drug up for just a few more days, just to be on the safe side to insure a complete recovery. When it sees you stop near him and a barrel sticking out the window of your vehicle, and it has already been darted twice, it will most likely put some distance and some other cattle between you and him. The best scenario to have during initial treatment is to wait until the animal’s head is turned to where its eyes are looking away from you as you make the shot. When the animal’s head is down taking a bite of feed isn’t a bad time to pull the trigger.
The last thing I want to do on new cattle that I am trying to teach to “eat” is to have them become afraid of my feed truck. Many times after I feed the cattle, I will drive away a few hundred yards, park the truck, and unload the ATV. I will preload the darts with the drugs and drive back to the cattle on the ATV to give them their shots. I have shot many cattle from horseback. (Make sure you and your horse have reached an “understanding” prior to trying this.)
One thing I do when possible is to stop my truck several hundred yards from the cattle in my initial approach to them out in the pasture, trying to stay unnoticed. I will observe them through binoculars. You will be able to tell more easily which ones are not feeling the best in the world. I’ll go ahead and load any darts needed right then and there. When you just drive up on them, all of the cattle will become more alert and look perhaps like they feel better than they actually do.
The reason for most missed or poorly placed shots will be due to misjudging the distance to your target. I will assume you made references of trajectories with measured distances, dart capacity, and power settings with your practice darts. Well now, you don’t have that measured distance. On especially longer shots, a rangefinder is a mandatory piece of equipment to have. Misjudging a distance of only a few yards can make the difference. Using a rangefinder in combination with the trajectory cards you made, and being a little sneaky in approaching an animal, you can accomplish some amazing shots successfully. Avoiding eye contact with the critter while positioning yourself can help. Some animals have a “sixth sense” and know when you are after them.
Drugs And Recipes
Now I am not a veterinarian. I’m just an old cowboy that has doctored countless head of cattle over the years. Don’t be using any information contained in this online publication without first consulting your vet. When it gets down to the drugs you use or anything pertaining to such, take the vet’s advice. When it comes down to shooting your remote injection system you ought to take my advice.
Pneu Dart, darts can deliver any drugs prescribed for the animal in need. Yes, we have in fact tested our product with the highest viscosity of fluids and have yet to experience a problem. Please note our recommended point of injection is forward of the shoulder just at the fold of the neck line.
Pneu-Dart, Inc. does not condone nor promote the extra-label use of veterinary pharmaceuticals unless on order and under supervision of a licensed veterinarian.
Sedated / Tranquilized Cattle
For purposes of this chapter I will be calling cattle immobilized, sedated, or tranquilized. If I describe the condition of the animal as being lightly sedated, it means the animal may lie down, but can get to its feet and travel with a staggering motion, but is much calmer and just isn’t quite sure what’s going on. (It is very sleepy). If I describe the animal as heavily sedated, the animal has difficulty getting to its feet, and if it manages to do so, usually falls back down and could be somewhat aware of its surroundings in an on and off manner. If I call the animal tranquilized, the condition of the animal will be that it is completely helpless and unaware of its surroundings. Actually, the word tranquilized means to chemically induce a calming effect. This calming can be induced at various levels; but as stated, I will be referring to this term when the animal is completely unconscious and has been taken to a place of total unawareness with some analgesic effect where some minor surgery could be applied with the animal feeling no pain. When the critter is revived, it will have no memory as to what occurred.
It is unfortunate that the United States have not conducted more studies on the chemical immobilization of domestic livestock. The drugs available are limited, and virtually all of them will be of an “off label” nature. The dosages given and the withdrawal time period set from injection to slaughter must be determined by your veterinarian and based on scientific data by this individual.
I had purchased some cutting bulls weighing around 600 pounds. The morning I went up to process these cattle, I found one that was a little on the “wild side” with its head trapped in an empty hay ring. (I modified the ring after this so it couldn’t occur again.) He could have escaped on his own if he would have just lowered his head and backed up. Needless to say, every time I tried to approach him on foot to provide assistance, he would raise his head and take off with the hay ring. I thought he was going to break his blanking neck. I penned the other cattle and started processing them, just after lightly sedating this steer with about one-forth of what it would have taken to heavily sedate him. As I was working the other cattle, I would look down at him occasionally. After about 15 minutes, I saw his butt go down allowing his head to slip right out. I suspended what I was doing, drove him to the working chute, gave him his shots and castrated him.
I’ve removed, or have had to saw into, plastic and steel pipe collars on cattle’s feet. These collars had been left by oilfield workers out in the pasture. I’ve taken old car tires off of cattle’s necks that have been washed onto property from a creek. I removed one tire from an 800 pound steer for a fellow that had cattle on an old abandoned farm with a “tire swing” suspended from a tree with a rope. (That was fun). I’ve partially sedated wild cattle that have tried to jump a steel fence and have ended up with their hind leg caught, just hanging there. After the drugs go to work, it’s usually possible to approach the animal and cut the fence with a torch without the animal flopping around and breaking the hind leg. I’ve partially sedated cattle with their heads stuck in the fork of a tree, or their hind legs caught in a tree root going downhill on a cattle path. (The partial sedation seems to make the chain saw a little quieter for them).
Say you have a calf escape from your pasture and you find it on your neighbor’s adjoining property. You’re lucky enough to trap it in your neighbor’s corral, but it’s not a very good pen, and you are afraid a good stiff wind could level the whole facility, let alone the fact that the calf is looking for a hole to escape from anyway. You strongly suspect that when you return with your trailer to load him, he will no longer be there. The solution will be to partially sedate the calf with a prescribed drug from your Vet. This should be enough to make him lay down, but not enough to put him completely asleep. When you return with the trailer two hours later, he’s still there but very sleepy, and with you coaxing him a little, you should be able to get him up and load him. One note on the above: You do not want to leave this animal until you are certain that he will remain in the sternum position, with his legs underneath him, or that if he does lay out flat, he will return to the sternum position on his own after a short period of time. The reason for this will be discussed when we get to a heavily sedated or tranquilized animal.
You or your order buyer made a mistake. Whoever did it, you ended up with crazy SOB you have been dealing with for quite some time. You have it in a good set of steel pens, but the crazy thing’s nose is already bleeding from both nostrils caused by it running into the gates. When he passes you in the pens, he has his head cocked sideways towards you, and he’s thinking about trying to see if he can fit into your hip pocket. You hope that if he does attempt to jump the pens, he clears them, and doesn’t end up dangling from the top rung of the corrals by one or both hind legs. A mild dosage of sedative could possibly prevent injury to the animal, or worse, injury to you, and many dollars if you end up with a crippled animal or an emergency room bill. You could have been ahead if you had given this partial sedation to old crazy before you had to enter the pens to deal with him on a personal basis.
Now all of this you have been reading has been based upon my personal experiences. But the ultimate and final source of drug information is going to be your veterinarian. When properly done, there should be no need to administer any antagonist or reversal drug to partially sedated cattle. This changes when we get into heavily sedated or tranquilized cattle dosages that must be employed for capture. When you are heavily sedating or tranquilizing an animal, you must keep one important thing in mind. The farther “down” or tranquilized the animal is, the closer it is to death.
Anytime you tranquilize any animal, its life will be in your hands. First, don’t even attempt it unless you have a plan and adequate help with you to handle any situations you may encounter. The animal should be protected from hypothermia in cold weather. You should be prepared for hyperthermia in hot conditions. You should know the normal heart rate and respiratory rate of the animal. You should know the normal temperature of the animal. You should at minimum know the entire above, monitor such, and know what to do to correct any problems encountered. You shouldn’t run the animal and get its adrenaline level elevated prior to tranquilizing. You will greatly reduce your chances of being successful and increase the chances of capture myopathy, which will result in the eventual death of the animal. You should leave the animal alone long enough for a proper induction time to lapse post injection. (Give the drugs sufficient time to work before the downed animal is approached). Chasing an animal after it’s darted is just as bad chasing it prior to darting it. The only exception to this would be in not trying to run after or towards the animal, but to do as little as necessary to haze it with a horse or ATV, or both, in order to keep it from entering timber or an area that would deny access for loading and transporting. Hopefully it will wander away to a clear area while all you have to do is just sit there quietly.
You must not leave a tranquilized hoofed animal lying on its side for too long a period of time. It can expire on you indirectly from bloat, with the bloating causing restricted diaphragm movement resulting in suffocation and/or heart attack. On a large animal it is necessary to have enough help on hand to get the animal to the sternum position, and a way to prop it up to keep it there. I’ve used square bales of hay, spare tires, or just anything you can think of to use as a wedge. If your intention is to tranquilize or heavily sedate, have the antagonist on hand prior to doing such. Should at any time during any portion of the procedure you think the animal may expire on you, you better be able to hit the jugular vein with such.
If you have “baited” the cattle with feed in order to get a shot at it, you want to make sure your subject doesn’t get very much of it. When it comes time to antagonize drug in the vein, the first few breaths the animal takes in can be violently deep, and you run the risk of any feed left in the back of the throat being sucked into the windpipe. That will kill them.
You should give an adequate dosage of the agonist with the first injection, once again your Vet should be performing these duties or there with you directing you at all times. It is actually better to slightly overdose the animal than it is to underdose it. It very seldom works to give additional darts of drugs if the first dart wasn’t enough. You will end up chasing the animal around more trying to get a second shot once you figure out you didn’t give enough the first time. This gets the animal more excited, and also lacks the rapid rise in blood level of the drug from one injection. You would be better served to monitor the underdosed animal from afar to make sure that when you leave, it will recover. You will hesitate to leave without the animal after you have made all the preparations and have gathered all the help required to accomplish the task; but you can always return another day and do it right. It would be better than killing the animal.
Again, this is just some of my experiences to let you know what you could be in for. The best, and only advice I want you to take from this is that you should attend a class and become certified in the chemical immobilization of animals, and do not do anything without the approval and under the direction and supervision of a licensed veterinarian.
Again, after the dart hits the animal, get away from it and leave it alone. Again, the only exception being is to haze it with a pickup, ATV or horse to keep it from reaching an area such as timber. You will want it to go down in an accessible place if your goal is to move it to a different location. It will take five to 10 minutes for most cattle to succumb. Once it heads to an open area that suits you, leave it alone. The more chased and aroused, the less likely it is that you will be successful. Keep noise minimal.
When the critter has been down for at least five minutes, I quietly sneak up behind it with a lariat in a gloved hand. Have a helper standing by in a pickup, horse or tractor. Slip the rope over its head and around its neck and motion for your helper to come up. Tie the loose end of your lariat to whatever your helper brings. This way, if the subject becomes aroused and gets on its feet, you will have it under control. With it under the influence of the drug, it doesn’t take much choking for it to fall down again. If this does happen, slack the rope and loosen the noose on its neck slightly to allow it to breathe.
Once the animal is down, and with the rope still attached, I tie the legs in preparation for the transport and security.
There are several different methods you can employ to transport sedated cattle. My favorite method is to use a pickup bed that is designed to move the feed, or larger round bales of hay. When the subject is secured by tying the front and hind legs, I lift it onto the trailer. This method is featured in the pictorial portion of this document using the same trailor as described in the next paragraph.
My second favorite method entails using an eight foot wide by 12 foot long flat bed trailer that is pinned on the front and pivots at the axle. I back this rig up to the head of the tied animal, pull the front pin and lower the rear of the trailer to the ground next to its nose. I pull this trailer with a four wheel drive pickup equipped with a winch on the bed. I then place a short chain around the animal’s neck and attach the hook of the winch cable to it underneath its chin to prevent choking as it is being loaded.
I winch it far enough foward upon the trailer that the trailer levels out and I can replace the front pin on the trailer. I then take two ratcheting cargo straps, place one over the shoulders and one over the butt and away we go!
Upon arriving at the final destination, I pull the pin on the trailer, hook a long chain to something secure and drive forward until the animal is on the ground. I then untie its legs, administer Tolazine in the vein to revive it and get out of harms way!
THE ROPE METHOD
With a stock trailer in position for loading, and a rope around the animal’s neck, thread the loose end of the rope through the back of the trailer and out the side of the trailer towards the front. Dally the end of the rope on a saddle horn or a truck. Once this is set up, arouse the animal with an electric prod (hot shot). When it is on its feet, jerk it into the stock trailer, shut the gate and slack the rope. A hay hook works well for reaching through the side of the trailer to loosen or to completely remove the rope.
On one occasion a fellow had eight head of cows and calves, which were all wild, that had escaped his pasture and were on public hunting land. The hunters were raising cane, feeling the cattle were disturbing their deer hunt. The owners of these cows had three stock trailers and four horses. The owners drove me to the location the cattle were feeding and I darted them all from the pickup. We had all eight head down at one time, and they used the rope method with their horses to load the cattle. The whole procedure took about two hours.
TRACTOR METHOD
Once I knocked down a wild cow weighing between 1,500 and 1,600 pounds for a fellow. She managed to travel behind a pond dam that was inaccessible for me in my flat bed, tilting trailer. However, before entering the pasture she was in, I noticed this client had a tractor with a bale spike attached to his front-end loader up by the pasture gate.
Upon getting her hog-tied (which, by the way, is a two-man job on an animal of this size), I sent the client to get his tractor. Upon his return I put a log chain between the cow’s legs and belly, and half-hitched the other end of the chain to his bale spike.
She dangled upside down for a quarter of a mile while he exited the pasture with her. Upon reaching his stock trailer, we threaded her in the back of it. I unhooked and untied her, gave her Tolazine in the vein and shut the trailer gate. Within three minutes of the Tolazine injection, she was rattling her new cage on the 15 mile trip to the sale barn!
Pictorial Tranquilizing Sequence
I have chemically captured and transported many large animals over the years for various reasons. This pictorial story pretty much shows how things are supposed to go. A neighbor had sold his cattle through Superior Livestock via video auction some months prior. On this day he called me he was making delivery of the cattle, thus fulfilling his obligation of the contract. He had done a good job of obtaining a favorable price when he sold the cattle, and sure wanted to deliver every steer he was allowed.
His cattle were to be hauled 10 miles to the local sale barn to be weighed, and then the buyer of the cattle was to load them onto a “pot” and shipping them 350 miles north to the feedlot.
The owners of the sale barn had video-taped the cattle and were taking the delivery for the purchaser. They were assisting my neighbor at his farm load the cattle onto the gooseneck trailers for the 10 mile haul when they encountered the problem of one goofy steer. They all made it out of harm’s way as the crazy steer tried to “clean their clocks” , so to speak, and then jumped the chin tall steel fence. The steer didn’t stop at that. He wasn’t satisfied until he was back in the pasture he had come from, and created a couple of “fence fixing” jobs getting there.
The neighbor lucked out when he reached me that morning, for a guy that had been helping me process some of my replacement cattle was with me. It is a must to have some good help when you tranquilizing and transporting a large animal, so with the neighbor included there were three of us on hand to accomplish the task.
I received his call just after the last steer of the last trailer load was leaving his place. My neighbor really didn’t want to leave a crazy 850 pound steer alone in the pasture and have to look forward of dealing with him later. If he did manage to get the steer trapped again and actually loaded for auction, the steer would bring at least a $100.00 less just because he would be sold as a wild single. There would be a substantial weight loss on top of that also.
It was turning out to be a good day for my neighbor and for me. I had the time, some help available, and had just recently purchased a new camera. I had always wanted some pictures of knocking down a wild bovine. My friend would have an unwanted problem disappear, and I could use the monetary fee I charged to help pay for my camera. My dart gun had paid for itself a long time before this day. “I don’t knock down cattle just for fun just because it is”.
Here’s the actual process we used that day which turned what could have been a very difficult, dangerous, and time consuming job into a safer way that took less than one hour.
This picture was taken of the first step in preparation to capture the animal. His weight had been estimated at 850 pounds. The appropriate amount of drug was loaded into the dart, and the dart was loaded into the projector as well as the clip of blanks. We put the dart gun in the cab, temporarily stowed the remaining gear, and went to find the steer.
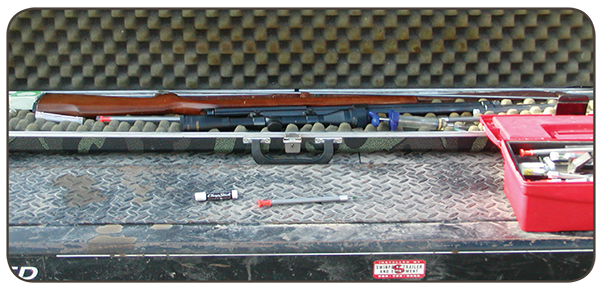
The bed on this truck was designed to load and unroll round bales of hay and was capable of lifting a ton. It would be utilized to lift and load the steer once we had him down and secured with ropes.
My helper was to follow me in my other feed truck that had a twelve by eight foot tilting flat-bed trailer attached to the bumper that the steer would be loaded onto. I told my helper Bobby, that once we arrived at the back pasture to where the steer was located, to stop and park the rig while my neighbor and I continued on in my feed truck to find and dart the steer. We traveled about a quarter of a mile over a hill when we discovered the steer under a tree that was next to an adjoining fence. I took this next photo just after implanting the dart into the steer’s neck.
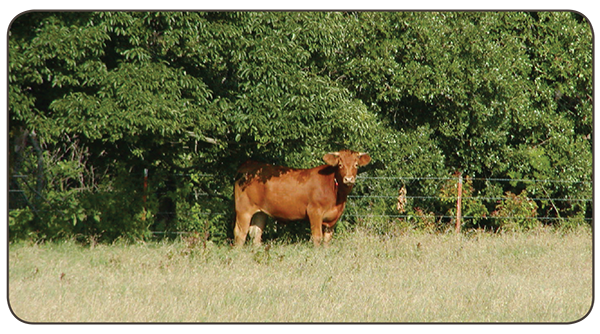
Since the projector had been prepared beforehand, all that was required was to work the bolt of the rifle to chamber the green blank and properly adjust the power control setting as we rolled to a stop 30 yards from the steer. The injection didn’t bother the steer too much. He just stood there and turned his head toward us to see what was going on as I snapped the photo. Immediately after the photo we drove back over the hill to Bobby.
Upon our return to the other truck we were out of the line of sight and ear shot of the yearling. It was a good time and place to ready the gear to be used to secure and load him with. The first step was to attach “extension arms” to the hydro-bed. I had made these arms up several tranquilized animals prior to this episode. I had discovered that when I tried to lift a ton bull into the air to place it on the trailer, there was a significant amount of lack in elevation. That damn bull was extremely hard to get onto the trailer as the bulk of his body was against the back end of the truck bed. (Another one of my hard learned lessons)
It took about ten minutes to attach the extensions and ready the ropes, chains, and cargo straps. I made sure everyone had leather gloves to avoid the possibility of a rope burn, at least on their hands, as well as putting a very sharp knife on by belt in the event someone became tangled in a rope and urgently needed loose. The most import thing in doing this type of work is to keep all the people involved as safe as possible. The next most important thing is to take care of the animal. The time lapse from injection was around 15 minutes at this point, which should be just about the right amount of drug induction time for the drug I used.
When we neared the animal at 40 yards, I helped Bobby unhook the trail from the truck, but had him stay in the truck, with the motor running. In the event I needed something bigger than the steer to take a rope dally on in order to secure the steer, Bobby could rapidly close that distance. It was now show time! Here is a photo of what the steer was doing as we were unhooking the flatbed trailer. I was pleased with the “zoom” on my new camera!

From the forty yard location I began my approach with lariat in hand. The closer I got to the steer, the slower and quieter I became. I always approach a downed animal from behind. I successfully placed the loop of the around the steers neck.
My neighbor had neglected to dehorn this steer back when it was only weighing 450 pounds as he preformed the initial processing if his stocker cattle. I wanted to position the lariat on the steer’s neck as opposed to just his horns. By doing this, in the event the steer got to his feet, I could choke him back down and maintain control of him. Cattle have individual metabolisms just like people do. Drug requirements for heavy sedation can vary from individual to individual, as some are more anxious than others. As an example, I’ve seen some people take a sip of whisky and become looped. I’ve seen others drink a half of fifth and behave pretty much normal. Through experience you should become knowledgeable enough to be able to “read” the animal and come close to choosing the proper amount of drug required for the task.

As you will see in the next photo, this steer did become aroused, and managed to get to its feet. At this point I became a little excited myself and shouted to Bobby, “stop taking photos and get his butt over here! “ I could just see myself belly surfing across the pasture while holding on to the end of the lariat and finding every rock on the place!
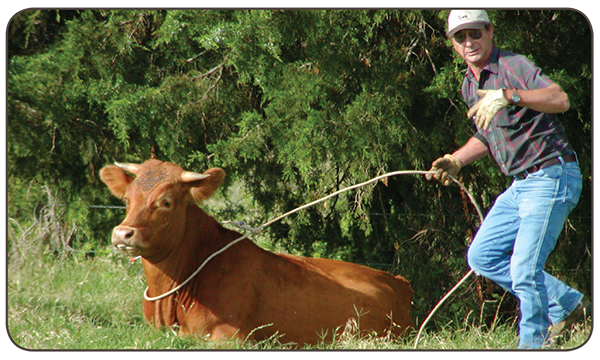
As it worked out, I managed to flip the loop from the rear of the steer’s neck up towards the throat area just behind his head, and it took little effort to choke the steer back to the ground by hand. Bobby arrived in a timely fashion and I would have been able to get the loose end of the rope hooked to the truck should that had been necessary. Since I had the steer flattened out, Bobby jump out of the truck and helped me tie the back legs together first, and then the front legs.
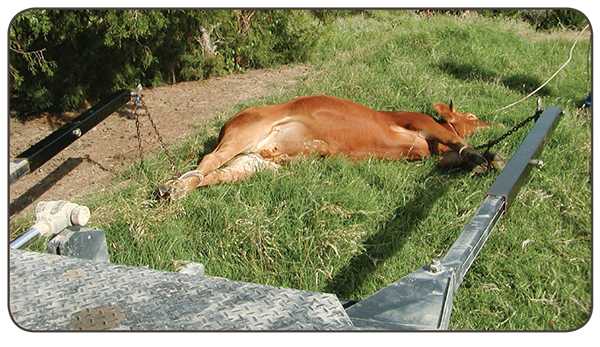
As Bobby went back to the trailer and hooked it on, I positioned my truck to load the steer.
We had loosened the rope on the steer’s throat earlier to allow it to get air. The steer had a moment of awareness as we place him on the trailer, and was struggling a little bit in an attempt to get loose. Bobby was holding the loose end of the lariat as I positioned the steer onto the trailer. He didn’t want to wrestle this thing anymore than I did, so he shut off some of the steer’s air off until the steer calmed down as you can see in the next photo. We loosened the noose again when he started behaving himself.
The next step was to secure the steer for the ride to the sale barn. I would sure hate for the steer to get loose while going through town on the way. I could just see him going through the plate glass windows of the stores.
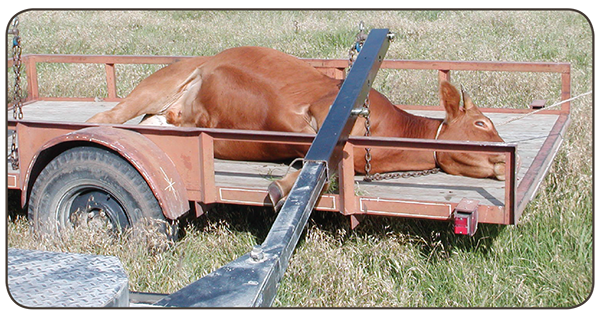
We put two ratcheting cargo straps over the steer. One was placed across the steer’s shoulder and the other one was placed across his hind quarters. You don’t want to restrict the animal’s respiratory system. The Xylazine was taking care of that already. We did leave the rope loosely around the steer’s neck, and had it tied to the trailer. … just in case!

What does not appear in any of the photos is the eye covering that was placed on the steer as soon as we were through securing the beast. A tranquilized animal might be asleep, but its eyes will remain open. If the eyes are exposed to the direct sunlight the retinas will be burned, and you could end up with a blind critter.
As soon as I was confident we could make the ten mile trip and arrive with the steer still secured, it was a against time with the steer laid out on its side. You don’t want bloat to kill him. Bobby was driving the truck with the trailer. I asked him to go as fast as the law would allow.
Upon arriving at the sale barn, the trailer was backed through a gate into an alley to unload. The pin was removed from the front of the trailer; the rope was move from the neck to around the steer’s horns and tied taut to the bottom of a post. By simply driving forward, the steer slid off onto the ground. I didn’t want to choke and further the steer anymore by leaving the rope on his neck at this point.

Had the steer not had horns I would have used a chain around the neck, and hooked the “pull off chain” on the bottom side of the throat, and under his cheeks. If this method had to be employed to pull and animal off the trailer, the pressure would be on the back of its head and not on its throat.
Untie the animal’s legs before injecting the antagonist. You won’t want to be doing this when it is awake!

When administering the recovery drug you will want to be in the jugular vein with you needle and use a pumping motion with the hand syringe plunger. Blood should be drawn back into the syringe to mix with the drug, and be repeated throughout the procedure slowly, until all the contents of the syringe are in the animal.
After you pull your needle out of the vein, it’s a good idea to get yourself out of the way. In this case I immediately grabbed the steer’s horn and assisted him to the sternum position on my way to the gate.

By the time I got through the gate and latched it, Old Crazy was up to his hooves.
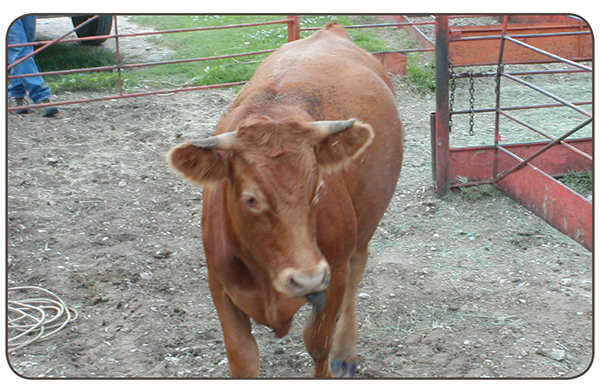
Within a minute of administering the Tolozine, his disposition was returning to normal.
The sale barn people had a little trouble with him once he neared the scales, as he was somewhat reluctant to step across the crack of the moving platform and turned on them. They did manage however, the steer’s weight was caught, and he was returned with the rest of the herd, loaded, and headed north. EVERYONE was glad to see him go!
Results
This photo shows a steer that doesn’t feel very well. He has a sluggish walk to him, he carries his head down, and he is not very bright eyed. This picture was taken early in the morning. After putting the camera up, he was injected with prescribed drugs.
This next photograph of the same steer was taken on the same day, but late into the afternoon. Note the remarked improvement in his health. He was actually coming up to the pickup truck wanting some feed. This was a result of doctoring him early when the symptoms first appeared by use of a dart. I avoided the stress he would have undergone if I had run him a half of a mile by horseback into the squeeze chute for medication.
The first picture of #76 shows a steer that had not received additional antibiotics since their arrival 31 days prior. After a period of rest for two days, they were processed. This entails administering vaccines, antibiotics, castration, dehorning, deworming and treating them for external pests.
The steer contracted what I refer to as “quick pneumonia.” If not treated immediately, he will be dead within 24 hours. During this last week, I had been checking the health and feeding them only once a day as opposed to twice a day during the initial three weeks. I thought I was over the “hump” as far as having anymore heath problems.
This steer was fine the previous day, had a healthy appetite and showed no symptoms of being ill. (In photo 2 note the yellow discharge in the corner of his eyes, which I might have missed) After I fed and checked them that day, a cold rain and high winds moved in.
On this next day, he was laid out with his head on the ground, coughing, breathing hard, and had a dull look in his eyes. He weaved somewhat after being aroused by the first set of darts with prescribed drugs.
The rest of the 85 cattle in the pasture had been surrounding ole # 76, and were eating in the feed troughs located about 75 yards away from him and doing fine. He did not move the entire time I was feeding and counting the healthy cattle.
This next picture shows him standing after being darted. Dart placement of this shot is in the neck, where the drugs will enter the blood stream promptly.
As the shot was made, the gel collar attached to the stainless steel needle of the dart holds the dart in the animal while the medicine is deployed. The body temperature present will dissolve this collar, and the dart will fall out in a time span of 15 to 45 minutes. This type of injection seems not to cause any more pain than conventional means. I have had many cattle (in an earlier stage of sickness than this one) go right back to eating with the rest of the bunch, paying no attention to the dart dangling from it. Sometimes the other cattle find it interesting though, as they sniff and lick it.
With his critical condition, I also loaded a 10cc dart to give him another dose of medication on the opposite side of his neck. Note in the next picture the dart placement is positioned low on the neck, below the heavy muscled area where some loose skin is present.
The following morning shows a photo of #76. It is very foggy; visibility is only 100 yards. The cattle were scattered all over the 160 acres, for when I honked the horn to call them, they came from every direction. Given the condition of #76 the previous day when first observed and darted, I had serious doubts about him coming, and was concerned about finding him in such dense fog. (If he was still alive) He felt much better.
The last photo listed is what I consider to be a poor shot placement as it struck near the point of the shoulder. It happened due to a combination of the steer moving and a light wind. On this particular shot the steer was being “led”. The sight was just behind his jawbone when the shot took place, however the combination of the aforementioned resulted in this dart placement. It worked out fine, for this in an intermuscular injection. Had the dart hit another three inches to the right, where the skin is loose behind the shoulder, it would have been a suitable site for a sub-q injection. The main thing was the medication did its work, and the steer was never darted again.